Firmware (ESPeasy)
I am currently migrating my sensor into ESPhome. This page is not going to be updated and will remain here just for reference.
ESPeasy
We are going to use ESP Easy developed by Let’s control it Team.
I2C interface
Once the firmware is loaded and you are connected to the admin panel visit Hardware tab and configure I2C interface
SDA - GPIO-5 (D1) and SCL - GPIO-4 (D2). This will allow OLED to work
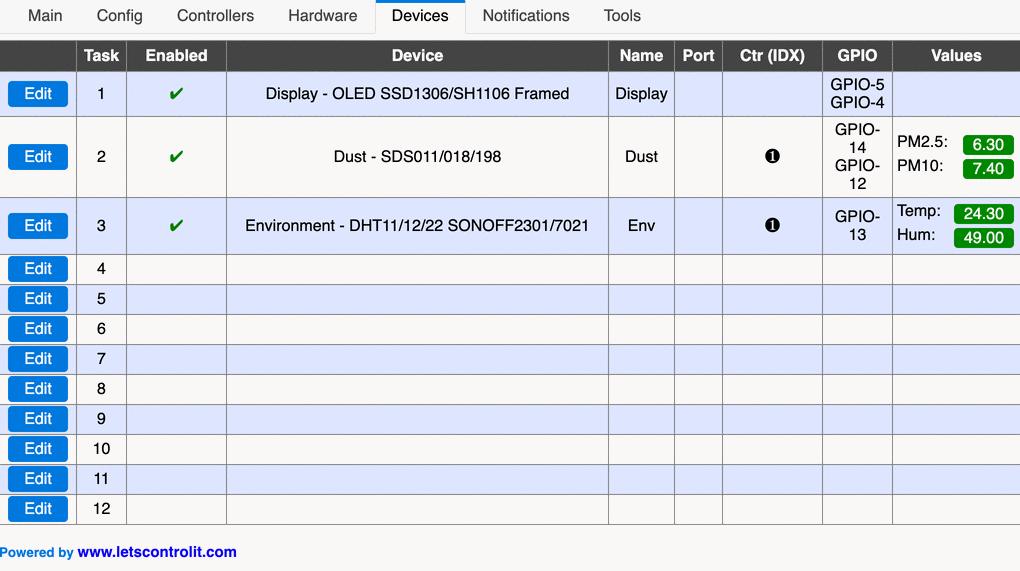
Devices
Now visit Devices tab. We are going to add 3 devices:
OLED
Select the OLED SSD1306/SH1106 Framed as the device.
I suggest to call it Display.
Please use SSD1306 controller and the 0x3C(60) - default I2C address.
Choose the correct orientation of the screen (Normal in my case).
There will be 3 Lines per frame.
We are now going to define those “lines” using these templates:
PM2.5:[Dust#PM2.5]PM10: [Dust#PM10][Env#Hum]% [Env#Temp]C
SDS011
Select the Dust - SDS011/018/198 as the device.
I suggest to call it Dust (it is referred this way in the OLED).
TX is connected to GPIO-14 (D5) in our case.
RX is connected to GPIO-12 (D6) in our case.
I suggest to set sleep time to 20 minutes.
Expose the values that are referred in our OLED config:
PM2.5with 2 decimalsPM10with 2 decimals
DHT22 (AMS2302)
Select the Environment - DHT11/12/22 SONOFF2301/7021 as the device.
I suggest to call it Env (it is referred this way in the OLED).
It is connected to GPIO-13 (D7) in our case and it is a DHT22 type.
Set the interval to 300 seconds.
Expose values that are referred in our OLED config:
Tempwith 2 decimalsHumwith 2 decimals
Working device
After these steps, your device should be fully functional!
Integration with smart home
There are multiple ways of integrating this device into your home automation setup. I am going to describe the most convinient one- using MQTT and Home Assistant - my preferred home automation solution.
Unit name
Visit the Config tab.
Set the Unit Name so it would be easier to refer the device, especially if you plan to add several units, I am going to use ESP_UNIT in this documentation.
Publish data to MQTT
Visit Controllers tab.
Select a MQTT protocol, I suggest OpenHAB MQTT that works with Home Assistant.
You need to provide the address and port of your MQTT server as well as the credentials (username and password).
Subscribe for topics home/%sysname%/# and publish to home/%sysname%/%tskname%/%valname%.
Add new sensors to HA
Now add these MQTT sensors to your config in Home Assistant (remember to replace ESP with the real unit name):
- platform: mqtt
  state_topic: 'home/ESP_UNIT/Env/Hum'
  unit_of_measurement: '%'
  name: 'ESP Humidity'
- platform: mqtt
  state_topic: 'home/ESP_UNIT/Env/Temp'
  unit_of_measurement: '°C'
  name: 'ESP Temperature'
- platform: mqtt
  state_topic: 'home/ESP_UNIT/Dust/PM2.5'
  unit_of_measurement: 'AQI'
  name: 'ESP PM25'
- platform: mqtt
  state_topic: 'home/ESP_UNIT/Dust/PM10'
  unit_of_measurement: 'AQI'
  name: 'ESP PM10'
After you restart the Home Assistant, you should be able to see readouts from your 4 freshly added sensors.